GNSS 8 Click
GNSS 8 Click is a compact add-on board that provides fast positioning capability. This board features the LC79DA, a high-performance dual-band and multi-constellation GNSS module from Quectel Wireless Solutions. It supports L1 and L5 bands for GPS, Galileo, and QZSS, L1 band for GLONASS and BeiDou, as well as L5 band for IRNSS. This version of the LC79D module supports a standalone mode, has a built-in flash, and boots firmware from the flash to work independently. It also can achieve a high industrial level of sensitivity and accuracy with the lowest power consumption. This Click board™ is suitable for both acquisition and tracking and represents an ideal product for automotive, consumer, and industrial tracking applications.
GNSS 8 Click is supported by a mikroSDK compliant library, which includes functions that simplify software development. This Click board™ comes as a fully tested product, ready to be used on a system equipped with the mikroBUS™ socket.
GNSS 8 Click as its foundation uses the LC79DA, a high-performance dual-band and multi-constellation GNSS module from Quectel Wireless Solutions. It supports L1 and L5 bands for GPS, Galileo, and QZSS, L1 band for GLONASS and BeiDou, as well as L5 band for IRNSS. Compared with the GNSS modules working on the L1 band only, LC79DA dramatically increases the number of satellites involved in tracking and positioning, reducing signal acquisition time and improving positioning accuracy even when the GNSS signal is absent or compromised. The LC79DA is AIS-140 compliant, and its on-board LNAs and SAW filters serve to ensure better positioning under weak signal conditions and other harsh environments, providing it with better performance in anti-jamming.

Besides Sleep and Standby operational modes, the LC79DA also has a Full-On mode that comprises tracking and acquisition modes. In acquisition mode, the module starts to search satellites and determine the visible satellites, coarse carrier frequency, and code phase of satellite signals. When the acquisition is completed, it will automatically switch to tracking mode. In tracking mode, the module tracks satellites and demodulates the navigation data from specific satellites.
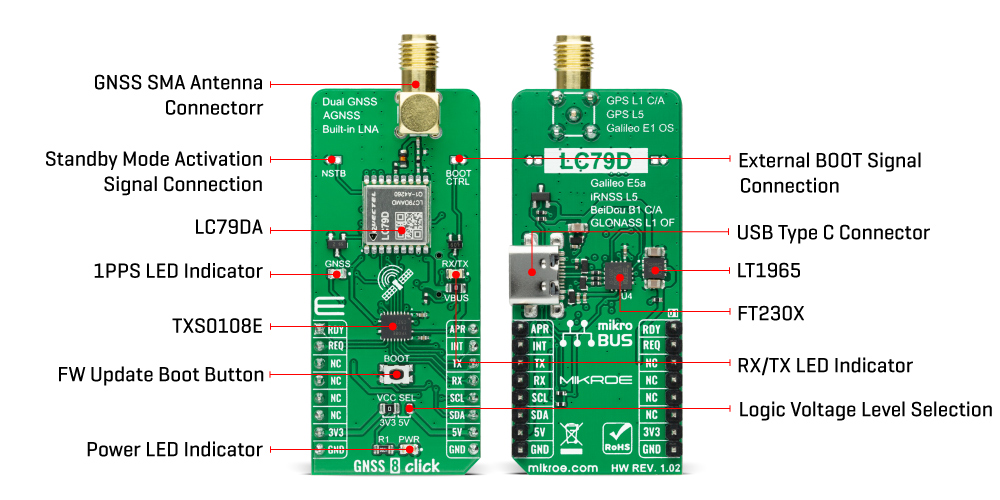
The LC79DA communicates with MCU using the UART interface with commonly used UART RX and TX pins as its default communication protocol operating at 115200 bps by default configuration to transmit and exchange data with the host MCU. It is also equipped with a USB type C connector, which allows the module to be powered and configured by a personal computer (PC) using FT230X, a compact USB to a serial UART interface bridge designed to operate efficiently with USB host controllers. Besides this bridge, it also possesses the RX/TX blue LED indicator that indicates whether the bridge is in RX or TX mode. The users can also use another interface such as I2C to configure the module and write the library by themselves.
The REQ pin routed on the RST pin of the mikroBUS™ represents data availability indication used to indicate whether there is data available for reading, while the INT pin on the mikroBUS™ socket represents a standard interrupt feature providing user with feedback information. Next to these pins, this Click board™ also uses AP request to send pin labeled as APR, routed on the PWM pin of the mikroBUS™ socket, and RDY module status indication used in conjunction with APR pin. The high level of the APR pin notify the module that the AP has data to be sent, and its low level means that data transfer has been completed, while RDY is used to indicate whether the module is ready for communication with the AP. Also, this Click board™ has an additional yellow LED labeled as GNSS that shows one pulse per second synchronized to GNSS satellites.
An onboard pushbutton labeled BOOT represents the StartUp mode control button. Pressing the button for about 100ms during the Power-Up sequence, the LC79DA module will enter the host mode, allowing the users to perform firmware download successfully. After the module enters host mode successfully, release the BOOT button. BOOT mode can also be achieved with external signal on BOOT CTRL header, on the same way as button. In addition, the additional header labeled as NSTB can be used both to access the Standby mode and to reset the module itself using an external signal.
GNSS 8 Click possesses the SMA antenna connector with an impedance of 50Ω, which can use it to connect the appropriate active antenna that Mikroe has in its offer for improved range and received signal strength.
This Click board™ can operate with both 3.3V and 5V MCUs. A proper logic voltage level conversion is performed by the appropriate voltage level translator TXS0108E, while the on-board LDO, the LT1965, ensures that the recommended voltage levels power module. However, the Click board™ comes equipped with a library containing easy-to-use functions and an example code that can be used, as a reference, for further development.
For all additional support questions, the customers can submit a ticket to the official Quectel Technical Support page.
Specifications:
| Type | GPS+GNSS |
| Applications | Can be used for both acquisition and tracking and represents an ideal product for automotive, consumer, and industrial tracking applications |
| On-board modules | LC79DA - high-performance dual-band and multi-constellation GNSS module from Quectel Wireless Solutions |
| Key Features | Multi-GNSS engine for GPS, GLONASS, IRNSS, BeiDou, Galileo and QZSS, support dual GNSS bands (L1, L5), built-in LNA for better sensitivity, low power consumption, high performance, and more |
| Interface | I2C,UART,USB |
| Compatibility | mikroBUS |
| Click board size | L (57.15 x 25.4 mm) |
| Input Voltage | 3.3V or 5V |
PinOut Diagram:
This table shows how the pinout on GNSS 8 Click corresponds to the pinout on the mikroBUS™ socket (the latter shown in the two middle columns).
OnBoard Settings And Indicators:
| Label | Name | Default | Description |
|---|---|---|---|
| LD1 | PWR | - | Power LED Indicator |
| LD3 | RX/TX | - | RX/TX LED Indicator |
| LD4 | GNSS | - | GNSS LED Indicator |
| JP1 | VCC SEL | Left | Logic Level Voltage Selection 3V3/5V: Left position 3V3, Right position 5V |
| J1 | NSTB | Unpopulated | Standby Mode Activation Signal Connection |
| J2 | BOOT CTRL | Unpopulated | External BOOT Signal Connection |
| T1 | BOOT | - | FW Update Boot Button |
GNSS 8 Click Electrical Specifications:
| Description | Min | Typ | Max | Unit |
|---|---|---|---|---|
| Supply Voltage | 3.3 | - | 5 | V |
| Operating Frequency Range | 1176 | - | 1602 | GHz |
| Sensitivity Acquisition | - | -147 | - | dBm |
| Sensitivity Tracking | - | -163 | - | dBm |
| Operating Temperature Range | -40 | +25 | +85 | °C |
Software Support:
We provide a library for the GNSS 8 Click as well as a demo application (example), developed using MikroElektronika compilers. The demo can run on all the main MikroElektronika development boards.
Package can be downloaded/installed directly from NECTO Studio Package Manager(recommended way), downloaded from our LibStock™ or found on Mikroe github account.
Library Description
This library contains API for GNSS 8 Click driver.
Key functions:
gnss8_generic_read- Data reading function.gnss8_generic_write- Data writing function.gnss8_set_ap_req- Set AP request pin state.
Examples description
This example showcases device abillity to read data outputed from device and show it's coordinates and altitude when connected.
void application_task ( void )
{
    gnss8_process();

    err_t error_flag = gnss8_element_parser( RSP_GNGGA, RSP_GNGGA_LATITUDE_ELEMENT,
                                             latitude_data );

    error_flag |= gnss8_element_parser(  RSP_GNGGA, RSP_GNGGA_LONGITUDE_ELEMENT,
                                         longitude_data );

    error_flag |= gnss8_element_parser(  RSP_GNGGA, RSP_GNGGA_ALTITUDE_ELEMENT,
                                         altitude_data );


    if ( error_flag == GNSS8_OK )
    {
        if ( last_error_flag != GNSS8_OK )
        {
            log_printf( &logger, "rn" );
        }
        log_printf( &logger, ">Latitude:rn - deg: %.2s rn - min: %srn",
                    latitude_data, &latitude_data[ 2 ] );

        log_printf( &logger, ">Longitude:rn - deg: %.3s rn - min: %srn",
                    longitude_data, &longitude_data[ 3 ] );

        log_printf( &logger, ">Altitude:rn - %smrn",
                    altitude_data );

        log_printf( &logger, "----------------------------------------rn" );
    }
    else if ( error_flag < GNSS8_ERROR )
    {
        if ( last_error_flag == GNSS8_OK )
        {
            log_printf( &logger, "Waiting for data " );
        }
        log_printf( &logger, "." );
    }

    if ( error_flag != GNSS8_ERROR )
    {
        last_error_flag = error_flag;
        gnss8_clear_app_buf(  );
    }
}
The full application code, and ready to use projects can be installed directly from NECTO Studio Package Manager(recommended way), downloaded from our LibStock™ or found on Mikroe github account.
Other mikroE Libraries used in the example:
- MikroSDK.Board
- MikroSDK.Log
- Click.GNSS8
Additional notes and informations
Depending on the development board you are using, you may need USB UART click, USB UART 2 click or RS232 click to connect to your PC, for development systems with no UART to USB interface available on the board. The terminal available in all MikroElektronika compilers, or any other terminal application of your choice, can be used to read the message.
MikroSDK:
This Click board™ is supported with mikroSDK - MikroElektronika Software Development Kit. To ensure proper operation of mikroSDK compliant Click board™ demo applications, mikroSDK should be downloaded from the LibStock and installed for the compiler you are using.
For more information about mikroSDK, visit the official page.
Resources:
Downloads:
Enter the code in the box below:


