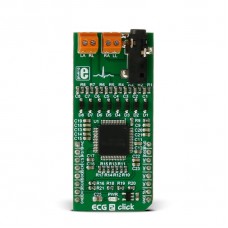
ECG 2 click
Track the patterns of your beating heart with ECG 2 click. ECG 2 click contains ADS1194 16-bit delta-sigma analog-to-digital converters from Texas Instruments, a built-in programmable gain amplifier (PGA), an internal reference, and an onboard oscillator.
The click communicates with the target MCU over SPI and the following mikroBUS pins: PWM, AN and INT. ECG 2 click runs on 3.3V and 5V power supply.
Note: We offer cables for three electrodes measuring (using 3.5mm jack onboard)
Setup guide – How to use the ECG 2 click
You will need the following things to start recording your ECG:
- 1.ECG 2 click
- 2.Cable
- 3.Disposable adhesive electrode pads (sold in packs of 30)
Of course, you will also need a target board with an MCU (preferably powered from an external battery).
There are two available measuring options:
1. For 3 wire measurement, a 3.5mm jack is used.
You can connect the click to a person using three electrodes placed on the left arm, right arm and the left side of the abdomen (below the heart) or alternatively on the left leg.
We offer cables and electrodes that are marked (left leg (LL) – red, left arm (LA) – black, right arm (RA) – white).
2. For 4 wire measurement, screw terminals are used.
ECG 2 click can also be connected by 4 electrodes that are placed on both arms and legs.
MikroPlot application
MikroPlot is a free data visualization tool (Windows) that can be used to generate an ECG.
The graph is generated from data sent from the MCU (ADC values from ECG click input + time stamp). A UART-USB connection is required.
See the learn.mikroe.com article for more information.
Power supply
ECG 2 click uses both 3.3V and 5V power supply — 3.3V is used as digital power supply and 5V is used for analog power supply (via linear regulator which gives stabilized 3V at output).
OverVoltage and OverCurrent protection
OverVoltage and OverCurrent protection is realized over 22k resistors and diodes.
Application
Measures the electrical activity of a beating heart through electrodes taped to the skin.
DISCLAIMER: ECG 2 click is a prototyping tool, not a medical-grade device. Do not use it to diagnose patients.
Specifications
| Type | Biomedical |
| Applications | Measures the electrical activity of a beating heart through electrodes taped to the skin |
| Key Features | ADS1194 IC, Onboard 3.5mm jack, Mikro Plot application, SPI interface, 3.3V and 5V power supply |
| Key Benefits | Ready-to-use example and free software tool to generate ECG plot, record ECG while you watch TV, read email, talk over the phone – study patterns to see what excites you (HRV - heart rate variability is a good indicator of state of mind). |
| Interface | SPI,GPIO |
| Input Voltage | 3.3V or 5V |
| Click board size | L (57.15 x 25.4 mm) |
Pinout diagram
This table shows how the pinout on ECG 2 click corresponds to the pinout on the mikroBUS™ socket (the latter shown in the two middle columns).
Programming
ECG2 click works best with a battery power supply. In cases where the board is powered through an USB cable, a periodical 50Hz noise will occur on the ECG signal. To counter this noise, the user must place their left hand on the ground pin of their development board.
Code set's up the ECG2 click, measures ECG and sends data to MikroPlot application.
01: void main() {
02:
03:   uint16_t i = 0;
04:   char final_string[20];
05:   char time_string[20];
06:   double time_value = 0.0;
07:   UART0_Init(57600);
08:   delay_ms(300);
09:
10:   GPIO_Digital_Input(&GPIO_PORTH, _GPIO_PINMASK_0);  // pin DRDY is input
11:   GPIO_Digital_Output(&GPIO_PORTC, _GPIO_PINMASK_4); // pin PWDN is output
12:   ECG2_PWDN = 1;                                     // ECG2 is powered up
13:   GPIO_Digital_Output(&GPIO_PORTG, _GPIO_PINMASK_0); // pin CS is output
14:   ECG2_CS = 1;                                       // deselect ECG2 click
15:   GPIO_Digital_Output(&GPIO_PORTE, _GPIO_PINMASK_2); // pin RESET is output
16:   ECG2_RESET = 1;                                    // pull RESET bit low for 18 CLK to RESET ECG device
17:
18:   // init SPI
19:   SPI0_Init_Advanced(500000, _SPI_MASTER, _SPI_8_BIT | _SPI_CLK_IDLE_LOW | _SPI_SECOND_CLK_EDGE_TRANSITION, &_GPIO_MODULE_SPI0_A245);
20:   ecg2_hal_init();
21:
22:
23:   // issue RESET pulse
24:   ECG2_RESET = 0;
25:   Delay_us(100);
26:   ECG2_RESET = 1;
27:
28:   Delay_ms(1000);
29:
30:   // device is in RDATAC mode, set it to SDATAC mode to edit registers
31:   ecg2_hal_send_command(SDATAC_COMMAND);
32:   delay_ms(1000);
33:   setup_ecg2();
34:
35:   while (1)
36:   {
37:     while (ECG2_DRDY) {} // Wait for ADS1194 device to prepare output data. Data is ready every 8 milliseconds
38:     Delay_us(5);
39:     for (i = 0; i < num_bytes_sample; i++)
40:         ecg_data_sample[i] = SPI_Read(0);   // read ADS1194 output data, one sample
41:
42:     time_value += 8.0;     // increment time value
43:     // calculate input voltage
44:     // voltage LA RA
45:     channel1_voltage = calculate_ecg_channel( ecg_data_sample, 3, Vref, channel_gain, channel1_voltage_offset );
46:     // voltage LL RA - channel 2 is usually used for simple ECG
47:     channel2_voltage = calculate_ecg_channel( ecg_data_sample, 5, Vref, channel_gain, channel2_voltage_offset );
48:     sprintf(final_string, "%.2f", channel2_voltage); // convert values to string and send to MikroPlot
49:     strcat(final_string, ",");
50:     sprintf(time_string, "%.2f", time_value);
51:     strcat(final_string, time_string);
52:     Uart_Write_Text(final_string);
53:     Uart_Write_Text("rn");
54:
55:     // voltage LL LA
56:     channel3_voltage = calculate_ecg_channel( ecg_data_sample, 7, vref, channel_gain, channel3_voltage_offset );
57:     // voltage from temperature sensor
58:     channel4_voltage = calculate_ecg_channel( ecg_data_sample, 9, vref, channel_gain, channel4_voltage_offset );
59:   }
60: }
Downloads
mikroBUS™ Standard specificationEnter the code in the box below:


